This post is about how to setup Hudsonfor continuous integration (CI) of a C++ project. This is mainly for my own (future) reference and I expect that it will be continuously improved (pun intended) in the future.
Hudson will be hosted in a virtualized Linux server. The OS will be Ubuntu 10.04 because is the distribution I am most familiar with and because it is a long term support (LTS) version of the distribution. It is expected that this version will be stable enough and that bugs will be addressed and resolved quickly. There will be no physical machine where to install Ubuntu. I will install it on a Virtual Machine created using the VirtualBox virtualization software. Setting up a virtual machine using VirtualBox is beyond the scope of this post, I’ll assume that you have successfully installed Ubuntu and that it is up and running. If you are going to start this task right now just make sure you reserve 1G of memory for the virtual machine since the default 512M seems that is not enough for running the Tomcat server.
At this point you should have a newly installed Ubuntu 10.04 up and running. The next step is to install all the necessary software. It involves:
First append the repository where the Java SDK can be found
sudo add-apt-repository "deb http://archive.canonical.com/ lucid partner"
sudo apt-get update
and now, install the packages
sudo apt-get install tomcat6 tomcat6-admin sun-java6-jdk mercurial cmake libcppunit-dev build-essential cccc lcov valgrindJust some standard Tomcat configuration here. Change tomcat’s user password to any you can remember.
sudo passwd tomcat6Download Hudson
cd /tmp
sudo -u tomcat6 wget http://hudson-ci.org/latest/hudson.war
Edit the file with tomcat’s users and create an administrator.
sudo vim /etc/tomcat6/tomcat-users.xml<tomcat-users>
<role rolename="tomcat"/>
<role rolename="role1"/>
<user username="tomcat" password="tomcat" roles="tomcat"/>
<user username="both" password="tomcat" roles="tomcat,role1"/>
<user username="role1" password="tomcat" roles="role1"/>
<role rolename="manager"/>
<user username="admin" password="admin1" roles="manager"/>
</tomcat-users>And now, start the tomcat server
sudo chown -R tomcat6:tomcat6 /usr/share/tomcat6
sudo /etc/init.d/tomcat6 start
And now, to deploy Hudson, open a browser and go to this URL http://localhost:8080/manager/html. Use the admin user you previously created and in the dashboard you are seeing now, scroll down to the War file to deploy and select the hudson war that you downloaded in the /tmp directory. Deploy and if everything goes OK, Hudson will be installed and you can access it in this URL http://localhost:8080/hudson Just for the curious of you, all the intermediate files and directories that Hudson uses go into /usr/share/tomcat6/.hudson
Now, you have Hudson up and ready, go to http://localhost:8080/hudson and navigate to the Hudson plugins page (Manage Hudson -> Manage Plugins -> Available) and select and install the following plugins:
Install them and let Hudson to restart itself.
Time to monitor an existing project for continuous integration. Here, we will use a sample project described in a previous post. So, go to http://localhost:8080/hudson and click on New Job
Calc) and chose the option Build a free-style software projecthttp://bitbucket.org/tonicebrian/cmake_sample_project as the** Repository URL** in the branch put, default.1. First **Add Build Step **and select **Execute shell script**. The commands are:
```bash
mkdir -p Release
cd Release
cmake -DCMAKE_BUILD_TYPE=Release ..
make
```
2. Add another **Shell Build Script** step that is intended to create the unit test coverage reports. In order to get meaningful reports, the executables are compiled with debugging info included. lcov is used to create meaningful reports. Check that there is one line that removes coverage of uninteresting sources (those under /usr/include)
``` bash
# Run and execute tests with coverage info
mkdir -p Debug
mkdir -p coverage
cd Debug
cmake -DCMAKE_BUILD_TYPE=Debug -DCOVERAGE=True ..
make
cd ..
lcov -d Debug/CMakeFiles/calc.dir/src/main/cpp -d Debug/CMakeFiles/UnitTester.dir/src/test/cpp --zerocounters
Debug/UnitTester
lcov -d Debug/CMakeFiles/calc.dir/src/main/cpp -d Debug/CMakeFiles/UnitTester.dir/src/test/cpp --capture --output-file coverage/calc.info
lcov -r coverage/calc.info "/usr/include/*" -o coverage/calc.info
genhtml -o coverage coverage/calc.info
```
3. Again, another **Execute shell** step for creating C++ metrics
``` bash
cccc `find src -name *.cpp`
```
4. This step is a **Execute shell** step with the goal of creating a report about the possible memory leaks when executing our tests
``` bash
valgrind --xml=yes --xml-file=valgrind.xml Release/UnitTester
```
5. The last step is the execution of a Python script that converts the XML output from valgrind to XML output that resembles the xUnit output schema. The idea is to treat memory leaks or other memory related problems as failed unit tests. This is a quick fix for integrating Valgrind in Hudson, if you know a better way please let me know. Again, **Add Build Step** but this time **Python script**
``` python
import xml.etree.ElementTree as ET
doc = ET.parse('valgrind.xml')
errors = doc.findall('//error')
out = open("valgrindTestResults.xml","w")
out.write('<?xml version="1.0" encoding="UTF-8"?>\n')
out.write('<testsuite name="memcheck" tests="1" errors="0" failures="'+str(len(errors))+'" skip="0">\n')
out.write(' <testcase classname="ValgrindMemoryCheck " \n')
out.write(' name="Memory check" time="0">\n')
for error in errors:
kind = error.find('kind')
what = error.find('what')
if what == None:
what = error.find('xwhat/text')
out.write(' <error type="'+kind.text+'">\n')
out.write(' '+what.text+'\n')
out.write(' </error>\n')
out.write(' </testcase>\n')
out.write('</testsuite>\n')
out.close()
```I have created a Mercurial projectwhere improvements to this script will be checked in. Please contribute!!
Update: I’ve included in the code base the XSL that is mentioned in the comments. Use whatever approach is more useful to you.
1. Check the **Publish JUnit test result report **checkbox and introduce in _Test Report XMLs_ this string **/valgrindTestResults.xml . This tells Hudson to look for this specific file and include it as part of the result set.
2. Next action is to select **Publish HTML reports** in order to show in the reports about Code Coverage and Cyclomatic Complexity. The exact values are: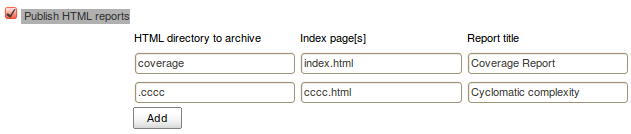
3. Add also the test results from CppUnit checking **Publish testing tools result report** and inserting in the text box `**/cpptestresults.xml`
4. The last step is to create a widget for reporting a summary of the Cyclomatic complexity checking the **Publish CCCC report** and setting the main file to `.cccc/cccc.xml`Save this options page and you are done!! Keep in mind that some reports are not displayed until some builds are in place. Any comment or improvement about the overall procedure is welcome. Enjoy it ;)